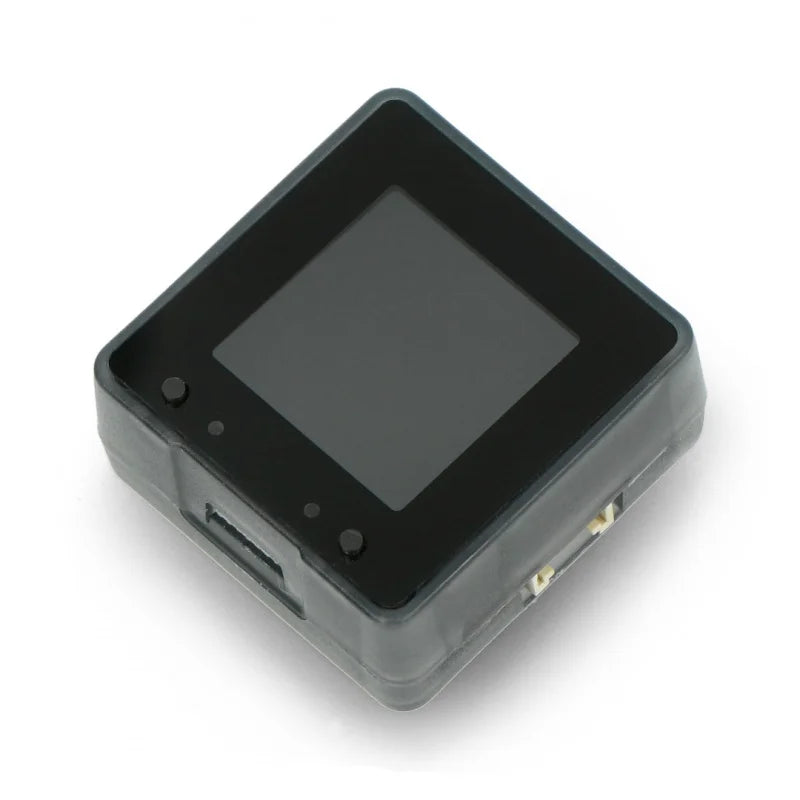
Maix Cube
The Maix Cube is designed for hobbyist who wants to pursue their passion with the latest technology. This incredibly powerful gadget is packed with a dual-core 64bit RISC-V 400 MHz processor, 8MiB of on-chip memory, and up to 128GB of expansion storage – perfect for storing all your projects!
SIPEED MaixCube can develop a programming learning kit, MaixCube integrates a 30W camera, expandable TF card slot, user buttons, IPS 1.3 inch display, 200mAh lithium battery, speaker, microphone, SPMOD, GROVE expansion interface, etc. on the hardware.
MaixCube is equipped with MaixPy by default on the software. Users can easily use MicroPython syntax to quickly get started with AI IoT development, and develop face recognition, object recognition, and other AI applications. At the same time, it also reserves development and debugging interfaces, which can also be used as a powerful AI learning development board.
Pin Out

Onboard expansion interface
Maix Cube opens two highly expanded interfaces to users: one SP-MOD and one Grove Interface, this makes it easier for DIY.
Onboard I2C device
MaixCube onboard I2C sensor/IC
| IC | Device id | I2C address (7-bit address) | MaixPy read address |
|---|---|---|---|
| ES8374 | 0x08 | 0x10 | D(16) |
| MSA301 | 0x13 | 0x26 | D(38) |
| AXP173 | 0x68 | 0x34 | D(52) |
Get started
Because MaixCube comes with its own GUI demo interface and sample programs, you can play with the preset programs first when you get the board.
After that, we will start to use MaixCube to get started with AIoT with MaixPy.
Before development, we need to understand and prepare related tools to reduce the pitfalls we have to follow because of insufficient preparation.
Steps to get started:
- Download the required drivers and software
- Connect the development board to the computer and install the USB driver
- Update the latest firmware
- Download and open the latest MaixPy IDE
- Connect MaixPy IDE to the development board Run the MaixPy sample program
3.1. Software and hardware preparation
Hardware preparation:
- Computer one
- MaixCube Development Board
- One reliable USB Type-C data cable: pay attention to a reliable data cable
Software preparation:
- USB driver
- Kflash_gui
- MaixPy IDE
When we get the Maix Cube and connect to the computer, we can open the device manager to check whether the serial port driver has been installed. The methods to open the device manager are:
- This computer (right click) -> Properties -> Device Manager
- Start menu (right click) -> Device Manager
- Control Panel -> (Search) Device Manager
Update the firmware to the latest version
After the user gets the development board, the onboard firmware may not be the latest version by default, so there will be more or fewer bugs during use.
We need to update the firmware version to the latest version at this time
View update method: Update Firmware
Run the first program
- LCD real-time preview Camera (when connecting with MaixPy IDE, select Maixduino)
import sensor, image, time, lcd

sensor.reset()
sensor.set_pixformat(sensor.RGB565)
sensor.set_framesize(sensor.QVGA)
sensor.skip_frames(time = 2000)
sensor.set_hmirror(1)
sensor.set_vflip(1)

clock = time.clock()

lcd.init(type=2)
lcd.rotation(2)

while(True):
    clock.tick()
    img = sensor.snapshot()
    print(clock.fps())
    img.draw_string(60, lcd.height()-120, "fps:"+str(clock.fps()), lcd.GREEN, scale=2)
    lcd.display(img)
Maix Cube Specification
- CPU: Dual-core 64bit RISC-V / 400MHz (double precision FPU integration)
- Memory: 8MiB 64bit on-chip SRAM
- Storage: 16MiB Flash, support micro SDXC expansion storage (max 128GB)
- Screen: 1.3 inch IPS Screen: Resolution 240*240
- Camera: Equipped with 0V7740 30W pixels Sensor
- Buttons: Reset button, power button (short press to turn on, long press 8S to turn off), three-way button
- USB: Type-C interface, positive and negative blind plug
- Audio: Support audio recording, playback, driver IC (ES8374)
- Onboard sensors: Three-axis acceleration sensor (MSA301)
- Lights: Onboard two RGB LEDs, one flashlight
- TF card slot: Multimedia resource expansion, support large-capacity storage
- Power management: AXP173 control unit, 200mAh lithium battery, support user charge and discharge control
Documentation